
Welcome to this second devlog for Embers Tactics! June was a busy month, with a lot of thinking, testing, and most importantly a more advanced first glimpse of what a real 3D battle map looks like.
I did not move every part of the game forward at once. This month was mostly about one major question: how do I produce maps properly without ending up with a heavy or fragile workflow? For a tactical RPG like Embers Tactics, that is a central topic.
Creating Battle Maps
In Embers Tactics, which is strongly inspired by Final Fantasy Tactics, almost everything happens either in menus or on maps. Even some scenes made only of dialogue will take place on maps. They will not all be used for combat, but they will always be a very visible part of the experience.
The heart of the game therefore lives on these maps: some will mostly establish mood, illustrate a scene, or support dialogue, while others will be actual battlefields. I then needed a solid process to create them, test them, adapt them, and improve them without friction.
The Workflow Problem
I wanted to avoid depending on a scattered chain of tools. I needed something practical, high-quality, easy to modify, and flexible enough to revisit a map if it lacks relief, feels too wide, too flat, poorly balanced, or simply less interesting than expected.
Godot does provide a 3D tilemap system. In theory, it lets you place blocks the way you would place tiles in a 2D platformer. That is interesting, but for my use case, I do not find it complete or intuitive enough to customize maps the way I want.
I looked for another solution, and the one that fits me best is actually quite simple: since I am comfortable with Blender, and since all maps are in 3D, I might as well create the maps directly in Blender.
Two Layers: Gameplay and Visuals
The question then was how to make a Blender scene truly usable in-game. The answer I implemented is based on two components: a gameplay layer and a visual layer.
The gameplay layer is made of placeholder cubes that are invisible in-game, with different heights. They are used to rebuild a purely functional map: which tiles exist, which tiles are playable, how high they are, and how Godot should understand them. The Godot code is already ready for this thanks to last month’s implementation. What remains is mostly building a clean bridge between the Blender gameplay assets and a map data file.
The visual layer sits on top of that. It is what the player actually sees. It only exists for scenery and has no direct interaction with the player. Thanks to this separation, I can build a map like a real 3D scene, with much more freedom, while still keeping the gameplay structure clear.
One-Click Export
To make this system truly usable, I created a small Blender plugin. Its role is simple: export the visual scene and convert the gameplay data into a format Godot can read. Everything happens automatically, in one click.
In practice, I can open Godot and see my map directly, clearly split between what belongs to gameplay and what belongs to visuals. This is exactly the workflow I needed: fluid, fast, and easy to correct.
The process now looks like this:
- I imagine a map or sketch one out.
- I create the visual blocking in Blender to establish volumes, foundations, and overall readability.
- I work on the visuals while adapting the gameplay in parallel. If the map is too flat, too wide, not tight enough, or missing elements, I can adjust it without blocking everything else.
- When I want to test it in Godot, or when I am satisfied with a version, I export and everything updates.
This matters a lot for the future. If later feedback shows that a map is missing something, does not work well, or causes balance issues, I will be able to revisit it easily. For a tactical game, that is almost mandatory.
First 3D Assets and Rendering
Once this setup was in place, I started creating 3D assets. I made a very pragmatic choice: going for a low-poly flat-design style.
In 3D, there are many steps between the idea for an object and its clean integration in-game. Depending on the chosen style, you may need manual UV unwrapping, detailed texturing, high-poly modeling, baking, and many other steps. With the style I am aiming for, I practically only have one step: low-poly modeling.
It is both an artistic constraint and a production constraint. I save a lot of time, which is essential for a solo project. In return, this style does not allow for an extremely detailed or highly elaborate look. Shapes, colors, and especially lighting therefore have to do a lot of the work.
The Importance of Lighting
Even successful 3D objects can quickly look poor without good rendering. On the other hand, excellent lighting can work wonders, even with fairly simple low-poly assets. So this is a key topic for Embers Tactics.
The issue is that a video game has to run in real time, sometimes on modest hardware. I am also targeting the Switch 2, so I need to be careful with performance. In a Blender render or in an animated movie, outputting a single image takes several minutes, sometimes hours, because the computer calculates many light bounces. In a game, it is different: since everything is real-time, the final render of each image has to happen extremely quickly.
After quite a bit of research and many attempts, I reached a first result that is not final yet, but already convincing and lightweight. The idea is not to use fully dynamic real-time lighting. Instead, I bake precomputed lighting into a file of several dozen megabytes.
When a map loads, the lights are already known and calculated. This is much cheaper than constantly recalculating everything. The limitation is that I cannot easily change the lighting inside the scene or make it dynamically interact with the player. For Embers Tactics, this tradeoff works very well: I prefer getting a beautiful and stable result over making too many compromises on visuals or performance.
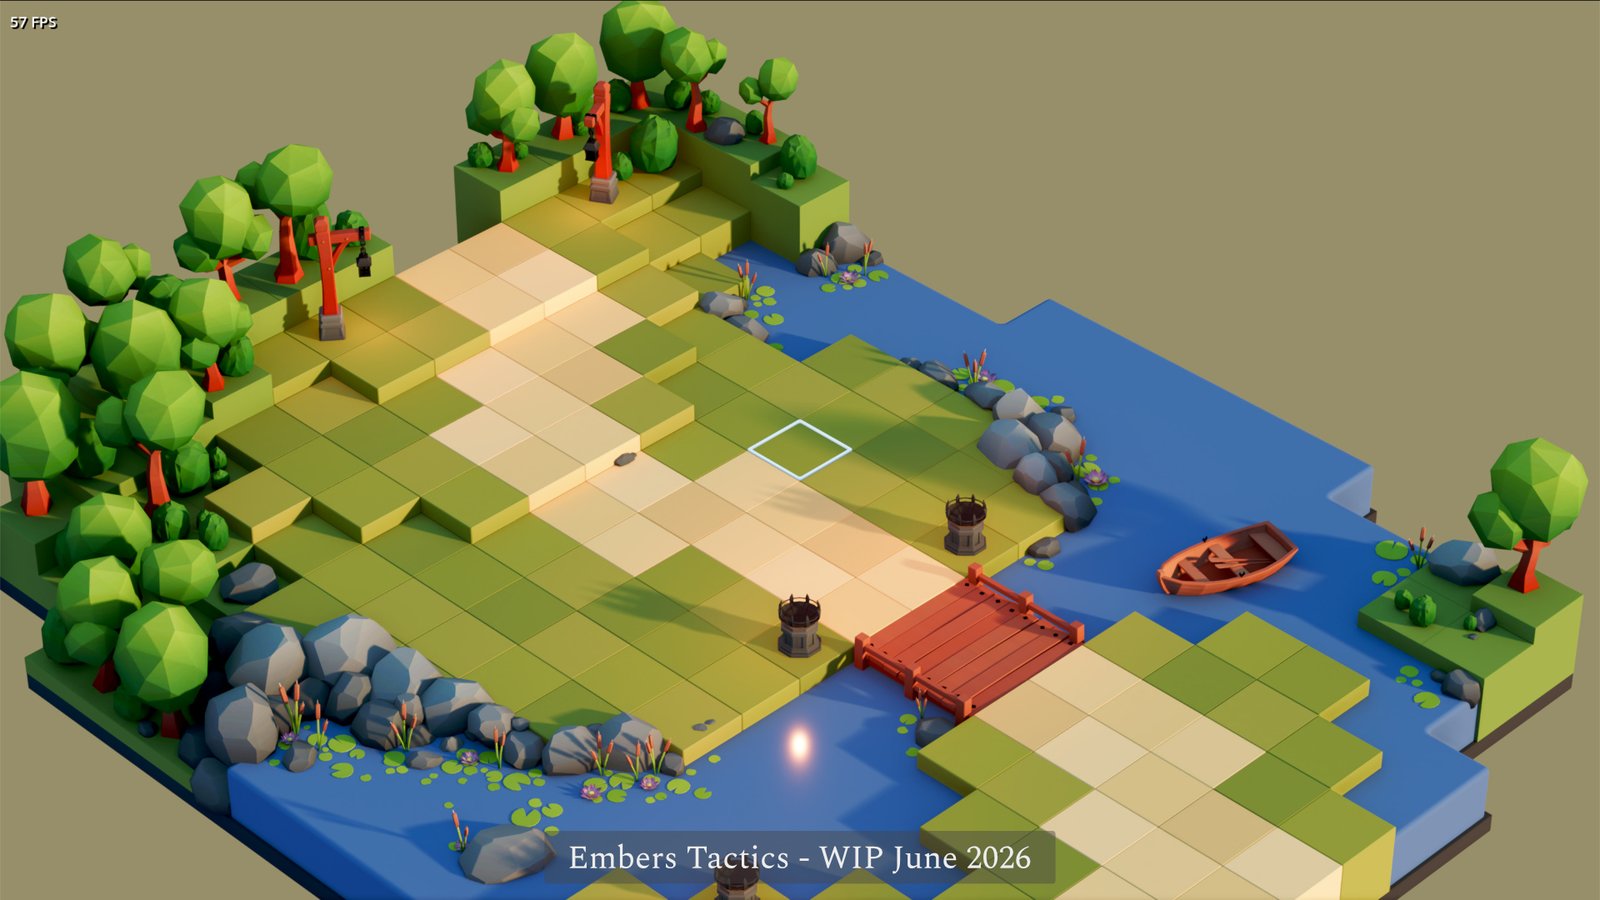
The most concrete outcome of the month is therefore a first non-final WIP preview of a map with assembled 3D assets, playable in Godot. I am not fully satisfied with the final look yet, and the whole environment is not finished. The trees, bushes, and water in particular still feel too rough. But the direction is starting to take shape.
Aelis and Concept Art
Alongside all of this, I started working with a concept artist. In almost every RPG, when a character speaks, you see their portrait. This matters even more in a game with pixel art characters and a roster made of unique companions. If I want players to grow attached to them, they need a real illustration, not only a small in-game sprite.
Since I am not good at 2D illustration, I needed to find someone who could create those portraits. And beyond the portrait itself, I needed a full character concept art: a clear base to present the character, but also to create the pixel art afterward.
Finding the Right Style
I spent quite a bit of time searching for artists on ArtStation. I saw many very talented people, but nothing had clicked yet. I already had an idea of what I wanted: something that partly recalls Ankama, with a colorful, slightly cartoonized, manga-influenced style without leaning into Japanese manga, and at the same time something a little more serious and mature, rougher and hand-painted, like Arcane.
That blend is not very common. You often find one or the other, rarely both in the same style. Then I found Celestra, who creates beautiful illustrations exactly in the direction I was looking for.
I contacted her, and we started working together on the main character’s design, Aelis. After several back-and-forths and a few weeks of work, Aelis’ design really started to take shape.
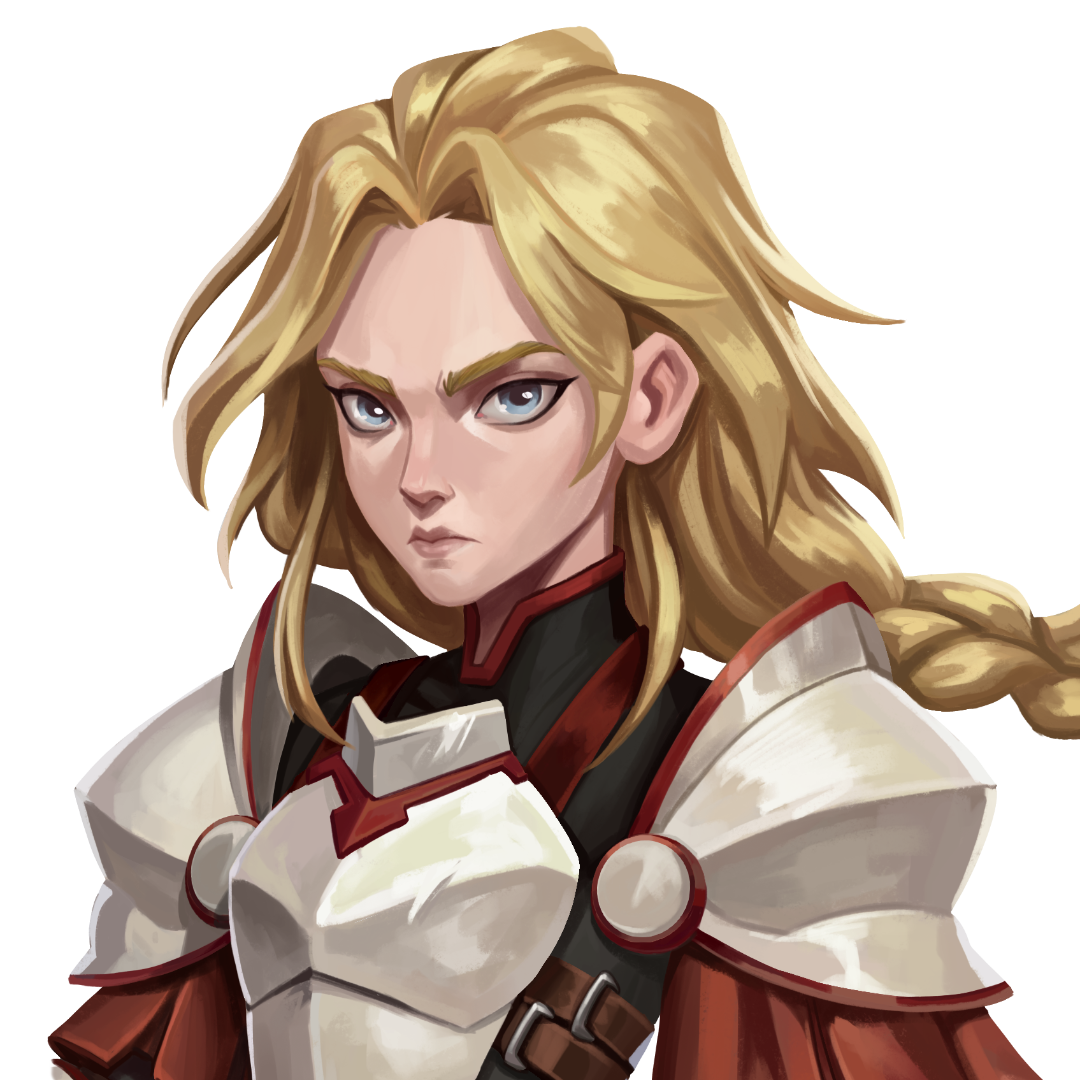
The final result now serves as the foundation for the in-game portrait and the next steps on the character. To see more of her work, and the complete illustration, I invite you to visit Celestra’s ArtStation.
This collaboration has been very fruitful, so we will continue working together. In the coming months, we will work on new portraits for the other characters.
Adapting the Pixel Art
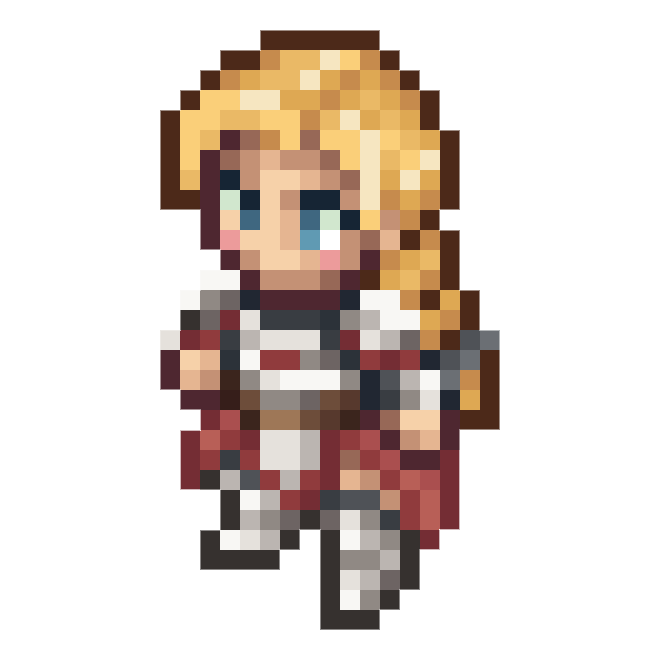
Receiving this new design for Aelis also allowed me to revise the initial pixel art I had created mostly from imagination, without a solid reference. This is exactly why a full concept art is useful: it gives a clear and coherent reference that is much easier to translate into a sprite afterward.
Next Steps for July
June was therefore mostly a major design month, and this is a part of the project I care about a lot. I did not move many other topics forward, but I laid important foundations for map production, 3D rendering, and the visual identity of the characters.
For July, I expect to keep going in this direction: develop the map further, adjust the lighting, refine the visual style of the game, and turn these first tests into something more stable.
That being said, thank you for reading this second devlog. You can always contact me by email (contact@embers-tactics.com) for any request or question. See you soon!